Productive Meetings Await
If you don’t waste your time, don’t let others waste it for you!
Get started for FREE and find out what you can accomplish with
the moderation powers of TIM on your side.
TIM is a powerful, distributed floating timer that can be sent to all participants in a meeting, in particular it is useful for on-line meetings to help better manage everyone’s time.
The meeting organizer can orchestrate the entire meeting, in beautiful sync, remotely.
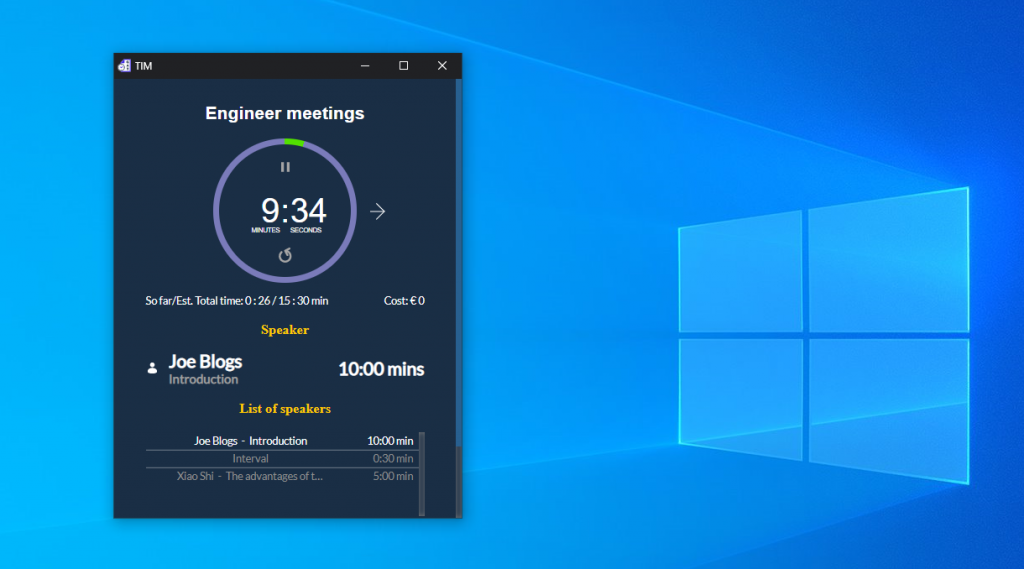
With TIM each speaker can see the speaking arrangement, the time they have been allocated, their next speaking slot and more. When speaking they will see how much time they have left and also will receive traffic light signals when their slot is near an end.
The organizer of the meeting can control everyone’s clocks centrally. This keeps everyone in sync. The organizer can pause, start and roll back the clock. They can also move back and forth through slots and speakers, making scheduling decisions on the fly. Best of all, every action they take is reflected on the participants’ timers also.
1. First install TIM from the Chrome Browser marketplace, or if you have already done so or if your G Suite domain admin has already deployed it for you, go to step 2.
2. Click on the TIM icon situated on the URL bar on your browser, or if these icons are hidden, select from the dropdown list.

3. When you open TIM for the first time you will be asked to login. You can do this with any Google account either from Google Workspace or Gmail. This will become your TIM account and be used to manage your TIM timers.

4. In the Settings page, click the ‘Add new’ button to create a new timer

5. A new screen will appear and from here you can enter the timer details.

Fill in the details to add the timer:
(Tip. If someone already sent you a JSON file of an existing timer they prepared you can import that timer here to create a new one. You might do this where there is a large panel of speakers already set up and you want to use the list again.)


Click on ‘Add next section’ or the ‘+’ to add the next section to the timer. The fields are free form and you can reverse them. Add the duration for each section.
6. After you have added all your topics and speakers you can finally save your timer by clicking on the Save button
At any time when creating or editing a timer you can drag and drop speakers and sections to rearrange your layout. After any addition or change don’t forget to save.
7. Once your timer is saved you can see it listed with other timers you may have created.

Moving the cursor over a timer will show you the full title.
In addition besides each timer, you will see a number of action buttons
8. As you can see in section 7 two links can be created, a user link and a management link. The user link will be what the meeting organizer sends to each of the participants. This link can be used even if the participants do not have a TIM account (but they still need the TIM extension from the Google marketplace).
If the meeting organizer would like to have other organizers controlling the meeting they can send those participants the management link. In this case, when they click on the link instead of launching TIM it will ask them to create a TIM account or log into their TIM account if they already have one.
Once they do so, the timer you just sent them will appear on their list. Like you, they will now become managers of that timer. All users, including managers, open a timer through the user link. However, if you are a manager or organizer of a meeting your TIM timer will have controls to let you manage the timers for all participants.
The User Link is the link everyone uses to open the TIM clock that they use during the meeting. Email this to all participants (including other organizers) and/or add it to the calendar event.
The Management Link is a link the organizer can send to other organizers if they want them to be able to manage the meeting also. This link creates a copy of the ‘timer’ in their TIM account and lets them stop, start and roll back the clock during the session.
The Management Link can not open the timer clock, only the User Link can do that.


In the screenshots above you can see the additional controls available to organizers in their timer windows.
These include stopping and starting the timer (play and rewind buttons inside the clock) as well as being able to move back and forth through the speakers and speaking slots (arrows to the left and right of the clock).
In the example above of the organizer view the break is already in the ‘red’ zone meaning it must finish soon. If the organizer feels they are not quite ready to resume, they can stop the timer for everyone and then resume it when they feel everyone can proceed.
Once an organizer has generated a user link for TIM they can send it to all participants in the upcoming event. The link can also be embedded in the calendar appointment. If this is the first time for a user to use TIM, then when they click on the link they will be asked to install the extension to their browser from the browser marketplace.
Once the extension is installed a TIM timer for this event will pop up on their screen. They can then move the timer to a blank space on their screen or to a second screen if they have one. This will allow them to follow the video conference while the scheduler sits to the side.
The TIM timer is like a small browser on its own. If it gets lost behind other browser tabs, it can be brought to the surface at any time by clicking on the TIM icon on the browser URL bar.
Once a timer is active just click on ‘Go To Timer’ to bring it to the surface.
With Chrome it is now possible to always have your clock ‘float’ over your active browser session where you are presenting or participating in the meeting.
First Open your TiM clock and it will run in a separate small browser window. When you click on your main browser window the TiM cloak will be pushed to the back. You can now click on the browser presentation button (see screenshot below) and select the ‘Float’ option. This will float your TiM clock to the front again, while leaving the background session active.

What you see when you click on the browser presentation button – select ‘Float’ to bring TiM to the top and have your clock float while still allowing you to work on your main browser below it.

As mentioned already, sections can be added and removed from a timer at any time. Sections can also be rearranged by dragging and dropping them to a new order position after they have been created.
Move over a section and ‘left click’ with your mouse to grab it and drag it to a new position.

This is ideal for moving one or two items, but if you have a large change to make you can export the timer to a file and edit the file.

The file exported is a standard JSON file and can be edited in any text editor.
After editing using a text editor, the updated or rearranged file can then be imported into TIM to update or create a new timer.

The basic format of a Timer Section is
{
“name”: “Introduction”,
“speaker”: “Joe Blogs”,
“duration”: 600
},
The entire schema is bracketed by the square brackets [ and ].
To create a new timer from an existing timer schema, simply click on New Timer and import the schema you wish to use, you can then save this new schema as a new timer by changing its name.
You can also email the. JSON file to a colleague to help them build their own timers, perhaps for a different meeting but with mostly the same team members.
TIM is a marketplace extension and can be installed domain-wide on any G Suite domain that uses the Chrome browser. By installing domain-wide every user on the domain will automatically have access to the extension and will not have to install it themselves from the marketplace.
For Enterprise and Business domains meeting organizers can hold structured meetings both internally and externally, improving presentations and saving time.
For Education domains teachers can make classroom sessions much more organized and meaningful, allotting equal time to each student.
TIM can be installed and deployed as an extension on Chrome or Chrome OS versions 70+. Only Chrome versions that accept extensions are acceptable (Chrome on mobile phones does not accept extensions yet). Admins not familiar with this process can learn more by going to Google’s Device manager console.
If you have purchased Google device manager for your domain it will become available as an icon in your Admin console.
If you have purchased Google device manager for your domain it will become available as an icon in your Admin console.
1. Enter the Devices and

2. Enter Chrome > Apps & extensions > Users & browsers

3. Select the OU where you want to deploy TIM and click on the yellow button. Select the option Add from Chrome Web Store. Adding to the root OU will ensure it is deployed to all users on the domain.

4. A Pop-up window will appear. Search for this string ‘timeismoney Tim’. This will find TIM for you right away.

5. Click on TIM and in the new box, press ‘+ Select’.

This will Add TIM to the OU you selected.
Once added Select ‘Force Install’ and this will deploy TIM to all users on your domain or selected OU. Remember to click ‘Save’ to save your settings.

If you don’t waste your time, don’t let others waste it for you!
Get started for FREE and find out what you can accomplish with
the moderation powers of TIM on your side.